Wednesday, December 23, 2009

Saturday, December 19, 2009

WIP: Infect! Part II - Berserker

I've been doing some more work on this monster model: time to start painting Berserker with his clear parts.
At first I was afraid I made him too Hulk-ish, but my customer said he likes him and I'm glad as I really like him too (sort of.. you know, hard to really like this guy!)

However, I soon enough realized that the clear parts were supposed to be painted red... my bad. So today I repainted him:


As a side note, I tried to use the luminous paint I got months ago specifically for this model, but it doesn't glow... this is weird! Maybe it needs to spend more time under the light to get "charged"? I don't know, let's see what happens...


I also finished Chii, but I haven't been able to snap a few decent photos yet (these ones too are so bad because I had to use the flash.. winter sucks for taking photos), so I will try as soon as a sunny day comes out.

More to come - hopefully!

Monday, November 2, 2009

Chii with Egg Whisk WIP - Part III

By the Murphy's law, here it is, the big problem! It's actually my fault for not realizing when I did the dry-fit that, other than the hair, another part had a major problem: her right arm. The arm didn't fit in the socket, a part of it protruded out and so I had to do a lot of grinding. Currently, her arm is covered in putty, hoping I will be able to make it presentable and to recreate at least some of the folds of the fabric.


Otherwise she'd be basically done. Of course her arm will need stripping and repainting... I also need to add some whipped cream around her face and clothes.
I'm especially happy with her face, it's the first time I paint Chobits-eyes and I wasn't sure about how to go for them. But I think they turned out ok.

Wednesday, October 28, 2009

Chii with Egg Whisk WIP - Part II

Yesterday I needed to take a break from Saber and Sakura, so I decided to start on Chii with Egg Whisk. I did start working on her hair months ago to tell the truth, as it was the only problematic part of the model. If you are interested in seeing how bad it was, you can find it here:

http://stuff-from-misato.blogspot.com/2008/10/asuka-angel-wip-strike-ii-and-while-we.html

It was like the parts were from different models, so much the fit was bad. It took me hours and hours of different kind of putty and a lot of sanding, to get a result that is not even decent in my book. But I can't let a piece of plastic to ruin my life, right? So I went ahead:


And to my surprise, I almost finished it in only one day! If nothing happens, tonight she'll be ready.. though she's supposed to be part of a diorama I'm planning, involving two more figures and a lot of Re-Ment goodies. Problem is, this diorama is growing in my head by the minute, and as it is I already don't know where to display it! ^_^;


So, this is Chii so far:

Thursday, October 22, 2009

WIP: Infect!

This is a commission piece I'm doing. Definitely not a beginner kit, that's for sure!
The ref photo is one I found online... it's an amazing paint-job and I'm trying to get inspired by it somewhat. Of course I know my limits...

So: skin tone painted on both Sakura and Saber. Though I'm not sure if I need to paint Saber's legs in flesh color or not, since in the ref photos she seems to be wearing white stockings. I'm waiting for a word from my customer about it.
This time I tried to use a different skin tone than my usual: I started with the palest I have, Flesh Tone by Americana, added some white and also a little yellow. I got a nice, pale tint!

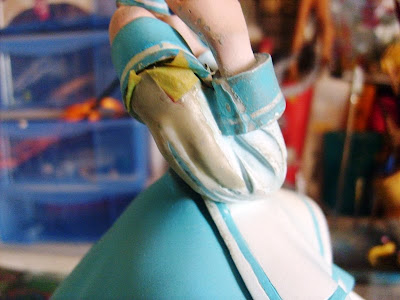
For the armor, this time I'm using Enamels: first some Model Master Chrome Silver:


Then I shaded it with Burnt Metal:

And then I painted the decorations in Humbrol Gold by brush:

I'm not sure if the fabric parts of her outfit are blue or black.. they seem blue from the ref photos but again, I will let my customer decide.
The rest of the model will be painted with acrylics as usual. The complex base also has some LED lights inside. However, the ones provided are all the same purple, so I substituted one with a red one, that I will place into Berseker head so to give him a red eye. I hope it works out.
The girls' eyes and the blood/whatever-they-are marks on bodies and armor will be painted with glow-in-the-dark paint.
I really hope this will come out alright!

Rei in School Uniform

At the beginning of 2005 my adventure into the Garage Kits world started. Rei laying on Nerv Logo was my first model painted, not so much because I especially liked it, but because I got it at a very good price from Ebay and it wasn't even a Thai Recast.
I ventured so into an art supplies store and I got tubes of acrylic colors and brushes, while the rest of the staff needed at the time was just found around the house (sandpaper, files, pliers...)
This is the result... not much to be happy about, uh?

I never meant to repaint my first work as it was supposed to give me an idea of my progresses in the hobby (if any are made) as a sort of bookmark.
However, at the time I hadn't pinned the parts, and with time the CA glue went brittle and the whole model came apart a few months ago. Having to fix it, I decided to contradict myself and paint it over.
I'm moderately happy with the result, except I hate the fact that the so time-consuming shadings are barely visible because of my poor photographic skills (and the bad weather we are having, which doesn't help when you can't take proper photos anyway!)
So.. here is the new version:


I should add that the Nerv logo is gone because... well, I can't find it anymore! ^_^; I put it somewhere before going to Palinuro for the summer, and now Puff!, it's gone. But it's a good thing, because I like Rei better this way! I do, honest! This is not the fox talking to the grape, ahahah!

Friday, July 17, 2009

WIP: Kit-bash conversion Asuka --> Nana Osaki

Recently I got hooked up with "Nana" by Ai Yazawa. I had never liked much her style, but Nana is such an incredible story and the characters are so likable that in a little while I got the manga, the anime and even the 2 movies.

One night I couldn't sleep (nothing unusual here) and, tossing in my bed, I started thinking about random stuff. And BAM! I got hit: I needed to convert this Asuka into Nana Osaki!


Photobucket
Photobucket

I have 2 versions of this Asuka: I got the first one when it came out, but when the second version, complete with decals and more clothing accessories, came out I had to get it again. And I'm glad I did, because the leather jacket will be perfect for Ms. Osaki! \(^o^)/ With all the spare parts I'll still be able to build Asuka, if I ever feel like.

The clothes were already pretty fitting for the purpose, the most obvious correction to be made was, of course, the hair.
At first I thought about using this Rei's hair, since I'm going to use her stockings and her microphone anyway:


Photobucket
But it turned out to be not the best idea: somehow Rei's hair, all nicely butchered up, seemed to be out of scale here, definitely too bulky:
Photobucket Photobucket
So I decided to start from scratch!
First attempts:

PhotobucketPhotobucketPhotobucketBut something still was not working right. After hours and hours of sanding, remodeling, sanding more, remodeling (you get the idea!) I got at this point:


Photobucket


Much better, no?


Photobucket
While I was on a 2 weeks vacation in Austria, I kept thinking about mods I could make. I decided that Nana doesn't need to hold the guitar. First thing, in the story she never actually play it on stage (at least up to the point of the story I reached) and by removing it, I'd also sort out the problem/mystery that has been tormenting me since the beginning: the guitar is too short and doesn't reach her hand!

So I chopped off the hand at the wrist:
Photobucket
I reattached it at a different angle and made her hold the microphone and the cigarette instead of the guitar (which will go on a stand next to the ampli... yes, this is a very ambitious project, ahah!):


Photobucket
Photobucket

Next, stockings and garter belts. I also started priming in black hair and leather jacket, to check the general effect:


Photobucket
Rummaging through my brother's left over crap, I also found something that I can mod into an ampli, saving me at least a little time and effort.. lucky day! (^_^)/

Front hair part, my worst nightmare!! But even this is getting done, slowly but surely! Well, not so surely, but slowly, yes! (^_^)'


Photobucket
Photobucket
Photobucket
Photobucket
More work is required on the bangs, but as I said, I'm getting there I think!
So this is where I stand right now:


Photobucket
Photobucket
Photobucket
This is it till the next update! (^_^)

Friday, June 26, 2009

1/6 Morte

I'm really bad at photography.. plus my camera's batteries died on me and they won't be available again till tomorrow, when I leave for Austria. Maybe when I come back I can take better ones... I really should as she's not glued yet to the seat and a pin is visible under her butt. Once glued you won't see it anymore.


I also included some old WIP photos: the sculpting of the bodice, the sculpting of the waist and one in which you can see her face a little better, since I wasn't able to take a close up of her face.